Building emeffe.com: From 'This Needs Updating' to Live in Production
How I rebuilt my personal website from scratch using Astro, Tailwind, and a lot of browser tabs... and what I learned along the way.

It started with a moment of embarrassment.
I was updating my LinkedIn profile, and on a whim, I clicked the link to my personal website - emeffe.uk - for the first time in what I can only describe as an uncomfortably long time. There it was: a static HTML page that still described me as “wandering in Liverpool”, listed projects from 2021, and proudly showcased a “Currently Learning: Rust and Go” section that had aged about as well as a milk carton left in the sun.
The worst part? The reason it had gone stale was baked into how it was built. Every update meant opening a raw HTML file, trying to remember which div controlled what, carefully not breaking the CSS I’d written two years ago, and then manually uploading the file to my IONOS server. It was a four-step process designed to make you not want to update your website.
So I did what any self-respecting infrastructure engineer would do when faced with a maintenance problem: I decided to completely rebuild it from scratch.
The “What Do I Actually Want?” Phase
Before writing a single line of code, I knew I needed to be honest about why the old site had failed me. The problem wasn’t really technical; it was that the edit loop was too painful. I’d built something I couldn’t be bothered to maintain.
So this time, the requirements were clear:
- Modern tech stack: something I’d actually enjoy working with
- A blog: so I could write about what I build (like this very post)
- A portfolio section: to properly showcase the homelab and projects
- CI/CD: push code, site updates. No manual uploads, ever again
- Self-hosted: running on my homelab, behind Traefik, like everything else
That last point was non-negotiable. I already had a perfectly good Proxmox server running 20+ Docker services. The website should be one more container in the stack, not some managed hosting somewhere.
Choosing the Tech Stack (Or: Why Astro?)
I’ll be honest: I went in expecting to have a debate with myself. React? Next.js? Hugo? Just hand-craft the HTML again but better this time?
After some research, Astro won without much of a fight, and for one reason above all others: it’s built specifically for content-heavy sites like portfolios and blogs. It generates pure static HTML at build time, ships zero JavaScript by default, and treats Markdown files as first-class citizens. That last point was huge for me. I wanted to write blog posts in Markdown (or even from Obsidian) without touching any page code.
The comparison that settled it: Next.js would have been like hiring a Formula 1 car to drive to the shops. Technically capable, massively over-engineered for what I needed.
For styling, Tailwind CSS was the obvious companion. Utility-first, excellent dark mode support, and (critically) no more maintaining a separate CSS file where I’d inevitably end up with classes named things like .navbar-but-the-new-one-v3.
The final production stack looked like this:
| Concern | Choice |
|---|---|
| Framework | Astro 5 |
| Styling | Tailwind CSS 3 |
| Content | Markdown files (Astro Content Collections) |
| Container | Docker (multi-stage build, Nginx) |
| Reverse proxy | Traefik + Cloudflare DNS/TLS |
| CI/CD | Forgejo Actions |
| Domain | emeffe.com (Cloudflare) |
The “What Should It Look Like?” Phase (A.K.A. The Browser Tab Graveyard)
This was the part I underestimated most. I thought I’d spend an afternoon looking at some nice sites and have a direction by dinner. I ended up with 15 browser tabs, a list of wildly different inspirations, and a genuine appreciation for why design is a profession.
My approach was to collect specific elements I liked rather than trying to find one site that did everything. The result was a mood board of stolen ideas:
- The nav behaviour: I wanted a navbar that starts transparent and shrinks into a floating frosted-glass pill as you scroll down. I found this exact effect on 5ime.cn and became mildly obsessed with it.
- The colour palette: Dark background (not full black, too cold), with purple accents. mattrbld.com had a black-and-purple scheme that gave off a “Discord in a good way” vibe. That was the direction.
- The layout: Randy Tarasevich’s site had the architecture I was after: a scrollable homepage with distinct sections, and separate pages for projects and blog posts. Clean, not corporate.
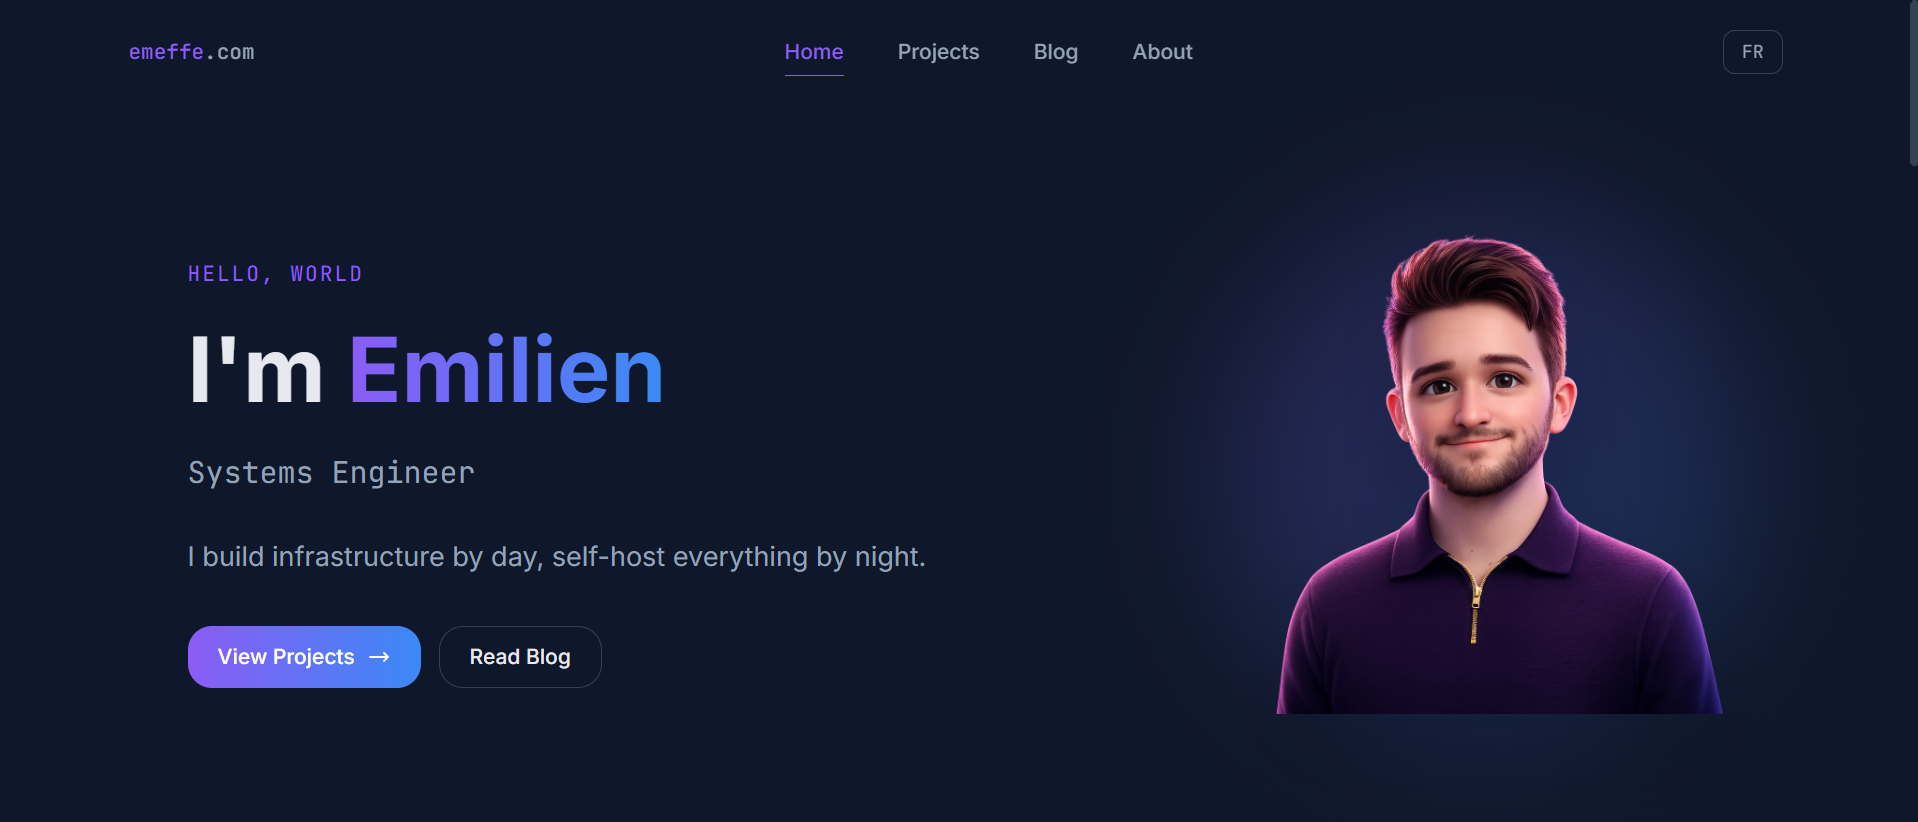
- The avatar: Kai’s site had a cartoon-style illustrated avatar instead of a regular photo, and I loved how personal it made the site feel.
That last point led to an interesting detour. I used Gemini to generate a Pixar-style 3D avatar from a photo of myself, iterated on the prompt a few times, and ended up with something I’m genuinely happy with: a 3D-rendered version of me in a dark navy zip-polo that accidentally matches the site’s colour scheme perfectly. Happy accidents.
The Design System
Once the direction was clear, I translated it into concrete decisions:
Colours:
The base is #0f172a (Tailwind’s slate-900), a deep navy-charcoal with more character than flat black. Cards sit on #1e293b (slate-800) for subtle depth. The accent is #8b5cf6 (violet-500), used for links, active states, and CTAs. Gradient highlights run purple to blue.
Typography: Inter for all body copy: clean, modern, readable. JetBrains Mono for code snippets and terminal-style accents, which felt right for an infrastructure engineer’s site.
The avatar glow: A blurred radial gradient behind the avatar image that pulses the purple accent colour. Took about ten minutes to build, looks like it took significantly longer.
The Content Architecture
One of the better decisions I made early on was treating the site as two distinct experiences: a homepage that acts as a highlights reel, and dedicated pages that go deeper.
The homepage shows: hero section, three featured projects, three latest blog posts, and a skills tag cloud. That’s it. Enough to tell you who I am and what I do, fast.
Everything else lives on its own page: /projects for the full portfolio, /blog for all posts, /about for the bio, experience timeline, certifications, and CV download.
I also added English/French bilingual support from the start. I’m French, based in the UK, and planning a move back to Bordeaux, so having the site available in both languages felt right. The approach was simple: a getLangFromUrl() utility that detects /fr/ in the URL, and a useTranslations() helper that picks strings from either en.ts or fr.ts. No libraries, no complexity. Blog posts are English-only by default, with a yellow “EN only” badge shown to French visitors.
What I’d Tell Myself at the Start
Spend more time on design research than you think you need to. The technical build goes fast. Knowing what you want to build is the hard part.
I probably looked at 20+ personal sites before committing to a direction. That time wasn’t wasted; every tab was narrowing down what I actually wanted. The sites I referenced most ended up being a French developer’s bilingual portfolio, a Chinese developer’s pill-nav site, and a documentation tool’s colour scheme. Good design inspiration comes from unexpected places.
Getting It Live (Or: Everything That Could Go Wrong, Did)
If the first half of this article was about building something beautiful, the second half is about the humbling experience of actually shipping it.
I had the site looking exactly how I wanted it. The Dockerfile was written, the docker-compose.yml was ready, and the Forgejo Actions pipeline was drafted. On paper, it was straightforward: push code, build Docker image, push to registry, SSH into server, docker compose up. Simple.
Reader, it was not simple.
The CI/CD Pipeline (A Comedy of Errors)
The pipeline lives in .forgejo/workflows/deploy.yml and has four jobs: checkout the code, log into the Forgejo container registry, build and push the Docker image, then SSH into the server and deploy. Here’s what the final version looks like:
- name: Install Docker CLI
  run: |
    apt-get update -qq
    apt-get install -y -qq docker.io

- name: Log in to registry
  run: echo "${{ secrets.REGISTRY_TOKEN }}" | docker login git.home.emeffe.com \
    -u "${{ secrets.REGISTRY_USER }}" --password-stdin

- name: Build and push Docker image
  run: |
    docker build -t git.home.emeffe.com/em/emeffe-com:latest .
    docker push git.home.emeffe.com/em/emeffe-com:latest

- name: Deploy via SSH
  run: |
    mkdir -p ~/.ssh
    echo "${{ secrets.DEPLOY_SSH_KEY }}" > ~/.ssh/deploy_key
    chmod 600 ~/.ssh/deploy_key
    ssh -i ~/.ssh/deploy_key -o StrictHostKeyChecking=no \
      ${{ secrets.REGISTRY_USER }}@${{ secrets.DEPLOY_HOST }} "
        cd ~/docker/emeffe-com &&
        docker compose pull &&
        docker compose up -d --remove-orphans &&
        docker image prune -f"
Looks clean, right? Getting there took about eight pipeline runs and a tour through some genuinely interesting infrastructure rabbit holes.
Problem 1: The action doesn’t exist. The original pipeline used appleboy/ssh-action@v1.0.3 for the SSH step, a popular GitHub Action. My Forgejo runner fetches actions from data.forgejo.org, not GitHub, and that action simply doesn’t exist there. Fix: replaced the action with a plain run step using the native ssh binary. Lesson: when running a self-hosted Forgejo runner, stick to actions that exist on data.forgejo.org or use raw shell commands.
Problem 2: The job container can’t see the Docker socket. Forgejo Actions spins up a fresh container for each job (a node:22-bookworm image by default). That container has no Docker CLI and no access to the host’s Docker socket. The runner’s config.yml has a docker_host option that defaults to - (disabled). Changing it to automount and adding the socket to valid_volumes wasn’t enough on its own. The magic line that actually fixed it was passing --add-host flags via the options key:
container:
  network: traefik_proxy
  options: "--add-host=git.home.emeffe.com:172.18.0.100 --add-host=forgejo:172.18.0.15"
  docker_host: "automount"
  valid_volumes:
    - '**'
Problem 3: The job container can’t reach the internal registry. Even with the socket mounted, the job container couldn’t connect to git.home.emeffe.com (my internal Forgejo instance). The domain resolves via AdGuard DNS to 192.168.68.110 (the VM’s LAN IP), which isn’t reachable from inside a Docker container due to how Docker networking works. The fix was the --add-host option above, which injects a /etc/hosts entry pointing the domain directly at Traefik’s static Docker IP (172.18.0.100), bypassing DNS entirely. This is exactly the same pattern as the extra_hosts fix for OAuth2 services; it just took a while to realise the job container had the same problem.
The CGNAT Plot Twist
With the pipeline finally green, I eagerly navigated to https://emeffe.com and was greeted with a Cloudflare 525: SSL handshake failed. Traefik had a valid Let’s Encrypt cert. The DNS records existed. The container was running. What was wrong?
Port forwarding. Or rather, the complete absence of it. I had never set it up on my TP-Link Deco router; ports 80 and 443 were simply not forwarded to the VM.
I set up the rules. Still broken. Checked with an external port checker. Port 443: closed.
A quick search confirmed the diagnosis: CGNAT. My ISP (FibreNest) runs Carrier-Grade NAT, which means I don’t have a dedicated public IP address. The IP I see as “mine” is actually shared with other customers behind FibreNest’s own NAT device. Port forwarding rules on my router are useless; there’s nothing to forward from.
This is more common than you’d think on residential UK broadband, and it’s a genuine headache for self-hosters.
The Fix: Cloudflare Tunnel
The solution was Cloudflare Tunnel, and honestly, discovering it felt like finding out about a cheat code. Instead of your server needing to accept inbound connections, the tunnel agent (cloudflared) runs on your server and establishes outbound persistent connections to Cloudflare’s edge. Traffic flows in through Cloudflare and down the tunnel, with no open ports and no exposed IP required.
It runs as a Docker container, naturally:
services:
  cloudflare-tunnel:
    image: cloudflare/cloudflared:2026.3.0
    container_name: cloudflare-tunnel
    restart: unless-stopped
    command: tunnel --no-autoupdate run
    environment:
      - TUNNEL_TOKEN_FILE=/run/secrets/cloudflare_tunnel_token
    secrets:
      - cloudflare_tunnel_token
    networks:
      - traefik_proxy
The tunnel sits on the same traefik_proxy Docker network as everything else, so it can reach Traefik directly at its static internal IP (172.18.0.100). In the Cloudflare dashboard, you configure public hostname routes that tell the tunnel where to send traffic:
| Public hostname | Internal service |
|---|---|
emeffe.com | https://172.18.0.100:443 |
www.emeffe.com | https://172.18.0.100:443 |
One gotcha: since the tunnel connects to Traefik over HTTPS internally, you need to enable No TLS Verify on the tunnel route. Otherwise Cloudflare’s tunnel agent will refuse to trust Traefik’s certificate. This is safe because the connection is internal; the public-facing TLS is handled entirely by Cloudflare.
There was one more wrinkle: a redirect loop. Traefik is configured to globally redirect all HTTP traffic to HTTPS at the entrypoint level. The tunnel was sending HTTP to Traefik, Traefik was redirecting to HTTPS, and the tunnel was following the redirect back to itself. The fix was pointing the tunnel at port 443 directly and enabling No TLS Verify, which lets the tunnel speak HTTPS to Traefik and bypass the redirect entirely.

The Result
After all of that (and I want to be clear, this was a genuinely entertaining afternoon) emeffe.com loaded in the browser with a padlock and my face on it.
The pipeline now works end to end: push to main, Forgejo builds the Docker image, pushes it to the internal registry, SSHes into the server, pulls the new image, and restarts the container. The whole thing takes about 90 seconds. No manual steps, no FTP uploads, no div archaeology.
The DDNS container I’d set up earlier (to keep Cloudflare DNS in sync with my dynamic IP) became redundant overnight. With the tunnel, there are no A records to maintain. The tunnel creates its own CNAME records and manages the routing entirely. I decommissioned it the next morning with a small amount of satisfaction.
What I’d Tell Myself at the Start (Part Two)
If you’re self-hosting on a residential connection in the UK, assume CGNAT until proven otherwise. Set up Cloudflare Tunnel from day one: it’s cleaner than port forwarding even if you do have a public IP.
The pipeline battles were frustrating in the moment but genuinely educational. Understanding why the job container couldn’t reach the registry (Docker networking, DNS resolution inside containers, the difference between the runner daemon and the job container) is the kind of knowledge that doesn’t come from reading documentation. It comes from staring at a timeout error for the fourteenth time.
The site is live. The pipeline is green. And for the first time in years, updating my website feels like something I might actually do.