Hardening My Homelab: From 57 to 75 and What I Learned Along the Way
A practical deep-dive into securing a self-hosted homelab: vulnerability scanning, host hardening, CrowdSec, and replacing legacy containers with something better.

I’ll be honest with you. For a long time, my homelab security posture was: “It’s behind Cloudflare, it’s fine.”
That’s not entirely wrong. A reverse proxy with good middleware, no open inbound ports, and Authentik SSO in front of everything is already a solid baseline. But one evening I started wondering: what’s actually running inside those containers? What CVEs are baked into my images? Is the host OS itself hardened at all?
The answers were… humbling. This post is about what I found, what I did about it, and the tools that now give me confidence I didn’t have before.
The Wake-Up Call
It started when I audited my .env files across all my Docker Compose stacks. Most were chmod 600, which is correct, but four of them were chmod 664. That means world-readable. Passwords, API keys, OAuth secrets. Anyone with a shell on that machine could read them.
find ~/docker -name ".env" -not -path "*/secrets/*" | sort | xargs ls -laThe fix was one command:
chmod 600 ~/docker/couchdb/.env ~/docker/diun/.env \
           ~/docker/reactive-resume/.env ~/docker/vaultwarden/.env
But it made me ask the uncomfortable follow-up question: what else have I been assuming is fine?
Container Vulnerability Scanning with Grype
The first tool I reached for was Grype, a container image vulnerability scanner from Anchore. It scans your Docker images against a live CVE database and reports which packages have known vulnerabilities, their severity, and whether a fix is available.
(Note: I evaluated Trivy first, which is arguably more popular, but it suffered a supply chain attack in March 2026 where malicious images were pushed to Docker Hub. Grype was the sensible choice while that dust settled.)
Installing it is a single command:
curl -sSfL https://raw.githubusercontent.com/anchore/grype/main/install.sh | sudo sh -s -- -b /usr/local/binRunning it against an image is equally simple:
grype apache/tika:latest 2>/dev/null | grep -E "High|Critical"What came back on my Wallos container genuinely surprised me. I was running bellamy/wallos:1.18.2, which was built on an Alpine base from 2021. The output included:
freetype          2.10.4-r3   CVE-2025-27363  High   69.2% EPSS
imagemagick       7.0.11.14   CVE-2023-34152  Critical  75.0% EPSS
php-cli           8.0.5       CVE-2024-1874   Critical  63.4% EPSS
openssl           1.1.1s-r0   CVE-2023-0286   High   88.3% EPSS
That last column is the EPSS score: the probability that a vulnerability will be exploited in the wild. An 88% EPSS on OpenSSL in a container running a web service isn’t theoretical risk. That’s real.
The fix was straightforward: bellamy/wallos:4.8.2 ships with a modern Alpine base and PHP 8.3. The CVEs evaporated.
To make this part of my regular workflow, I wrote a script that scans all running containers and outputs a structured summary:
#!/bin/bash

VULNERABLE_IMAGES=0
CLEAN_IMAGES=0
CRITICAL_COUNT=0
HIGH_COUNT=0
HIGH_EPSS_IMAGES=""

IMAGES=$(docker ps --format '{{.Image}}' | sort -u)

for IMAGE in $IMAGES; do
    OUTPUT=$(grype "$IMAGE" 2>/dev/null)
    HITS=$(echo "$OUTPUT" | grep -E "High|Critical")

    if [ -z "$HITS" ]; then
        CLEAN_IMAGES=$((CLEAN_IMAGES + 1))
        continue
    fi

    VULNERABLE_IMAGES=$((VULNERABLE_IMAGES + 1))
    IMAGE_CRITICALS=$(echo "$HITS" | grep -c "Critical" || true)
    IMAGE_HIGHS=$(echo "$HITS" | grep -c "High" || true)
    CRITICAL_COUNT=$((CRITICAL_COUNT + IMAGE_CRITICALS))
    HIGH_COUNT=$((HIGH_COUNT + IMAGE_HIGHS))

    # Flag any image with EPSS > 10%
    HIGH_EPSS=$(echo "$OUTPUT" | grep -E "High|Critical" | awk '{print $NF}' \
        | grep -v "^<" | awk -F. '{if ($1+0 >= 10) print $1}' | head -1)
    if [ -n "$HIGH_EPSS" ]; then
        IMAGE_SHORT=$(echo "$IMAGE" | awk -F'/' '{print $NF}' | cut -d: -f1)
        HIGH_EPSS_IMAGES="${HIGH_EPSS_IMAGES}${IMAGE_SHORT},"
    fi
done

echo "VULNERABLE_IMAGES=${VULNERABLE_IMAGES}"
echo "CRITICAL_COUNT=${CRITICAL_COUNT}"
echo "HIGH_COUNT=${HIGH_COUNT}"
echo "HIGH_EPSS_IMAGES=${HIGH_EPSS_IMAGES%,}"
echo "CLEAN_IMAGES=${CLEAN_IMAGES}"
This runs weekly via an n8n workflow every Monday morning. If any image has a CVE with EPSS above 10%, I get an urgent Ntfy push notification. Otherwise, a quiet summary lands on my phone.
One important reality check: most of the CVEs Grype reports are (won't fix) entries from upstream OS vendors, or Go stdlib version bumps in embedded runtimes. The actionable ones are where the image maintainer has fallen behind on updates. The EPSS score is your signal for what to actually care about.
Host Hardening with Lynis
Scanning containers covers the application layer. But what about the Ubuntu Server VM they’re running on?
Lynis is a battle-tested host auditing tool. It checks hundreds of configuration items across SSH, kernel parameters, PAM settings, file permissions, and more. It produces a hardening index out of 100 and a prioritised list of suggestions.
sudo apt install -y lynis
sudo lynis audit system --quick
My initial score: 57/100.
Not terrible, but not great either. The report was a goldmine of quick wins. Here’s what I actually acted on.
SSH Hardening
Most of my SSH settings were commented out defaults. I added an explicit hardened block to /etc/ssh/sshd_config:
X11Forwarding no
AllowTcpForwarding no
AllowAgentForwarding no
TCPKeepAlive no
LogLevel VERBOSE
MaxAuthTries 3
MaxSessions 2
ClientAliveCountMax 2
Always validate before restarting:
sudo sshd -t && echo "Config OK"
sudo systemctl restart ssh
Disabling Unused Network Protocols
Lynis flagged dccp, sctp, rds, and tipc as active kernel modules with no justification. These are obscure network protocols with CVE histories and no use case on my server. Blacklisting them is trivial:
sudo tee /etc/modprobe.d/disable-protocols.conf << 'EOF'
install dccp /bin/false
install sctp /bin/false
install rds /bin/false
install tipc /bin/false
EOF
The install X /bin/false pattern means any attempt to load the module will silently fail. It persists across reboots.
Kernel Parameter Tuning
Lynis compares your running sysctl values against a hardened profile. I created /etc/sysctl.d/99-hardening.conf:
dev.tty.ldisc_autoload = 0
fs.protected_fifos = 2
fs.suid_dumpable = 0
kernel.core_uses_pid = 1
kernel.kptr_restrict = 2
kernel.perf_event_paranoid = 3
kernel.sysrq = 0
kernel.unprivileged_bpf_disabled = 1
net.core.bpf_jit_harden = 2
net.ipv4.conf.all.log_martians = 1
net.ipv4.conf.all.rp_filter = 1
net.ipv4.conf.all.send_redirects = 0
net.ipv4.conf.default.accept_source_route = 0
net.ipv4.conf.default.log_martians = 1
Apply immediately without a reboot:
sudo sysctl -p /etc/sysctl.d/99-hardening.confA few of the more interesting ones:
kernel.kptr_restrict = 2: hides kernel pointer addresses from unprivileged users, making certain privilege escalation techniques harderkernel.unprivileged_bpf_disabled = 1: prevents unprivileged users from loading BPF programs, which have been exploited in several container escapesnet.ipv4.conf.all.log_martians = 1: logs packets with impossible source addresses (a common sign of spoofing)
Other Quick Wins
A few more items that are easy to overlook:
# Install packages Lynis recommends
sudo apt install -y libpam-tmpdir debsums apt-show-versions

# Purge old removed packages
sudo dpkg --purge $(dpkg -l | grep '^rc' | awk '{print $2}')

# Add login banners (minor, but affects the score)
echo "Authorized access only. All activity may be monitored." | sudo tee /etc/issue
sudo cp /etc/issue /etc/issue.net

# Disable core dumps
echo "* hard core 0" | sudo tee -a /etc/security/limits.conf
echo "* soft core 0" | sudo tee -a /etc/security/limits.conf

# Restrict compiler access to root only
sudo chmod o-rx /usr/bin/gcc* /usr/bin/cc* /usr/bin/g++* 2>/dev/null || true
After a reboot to activate the protocol blacklists and kernel changes: 75/100, zero warnings.
Like the Grype workflow, Lynis now runs automatically every Monday at 09:15 via n8n, SSHing into the VM, running the scan silently, and sending the hardening index and warning count to Ntfy.
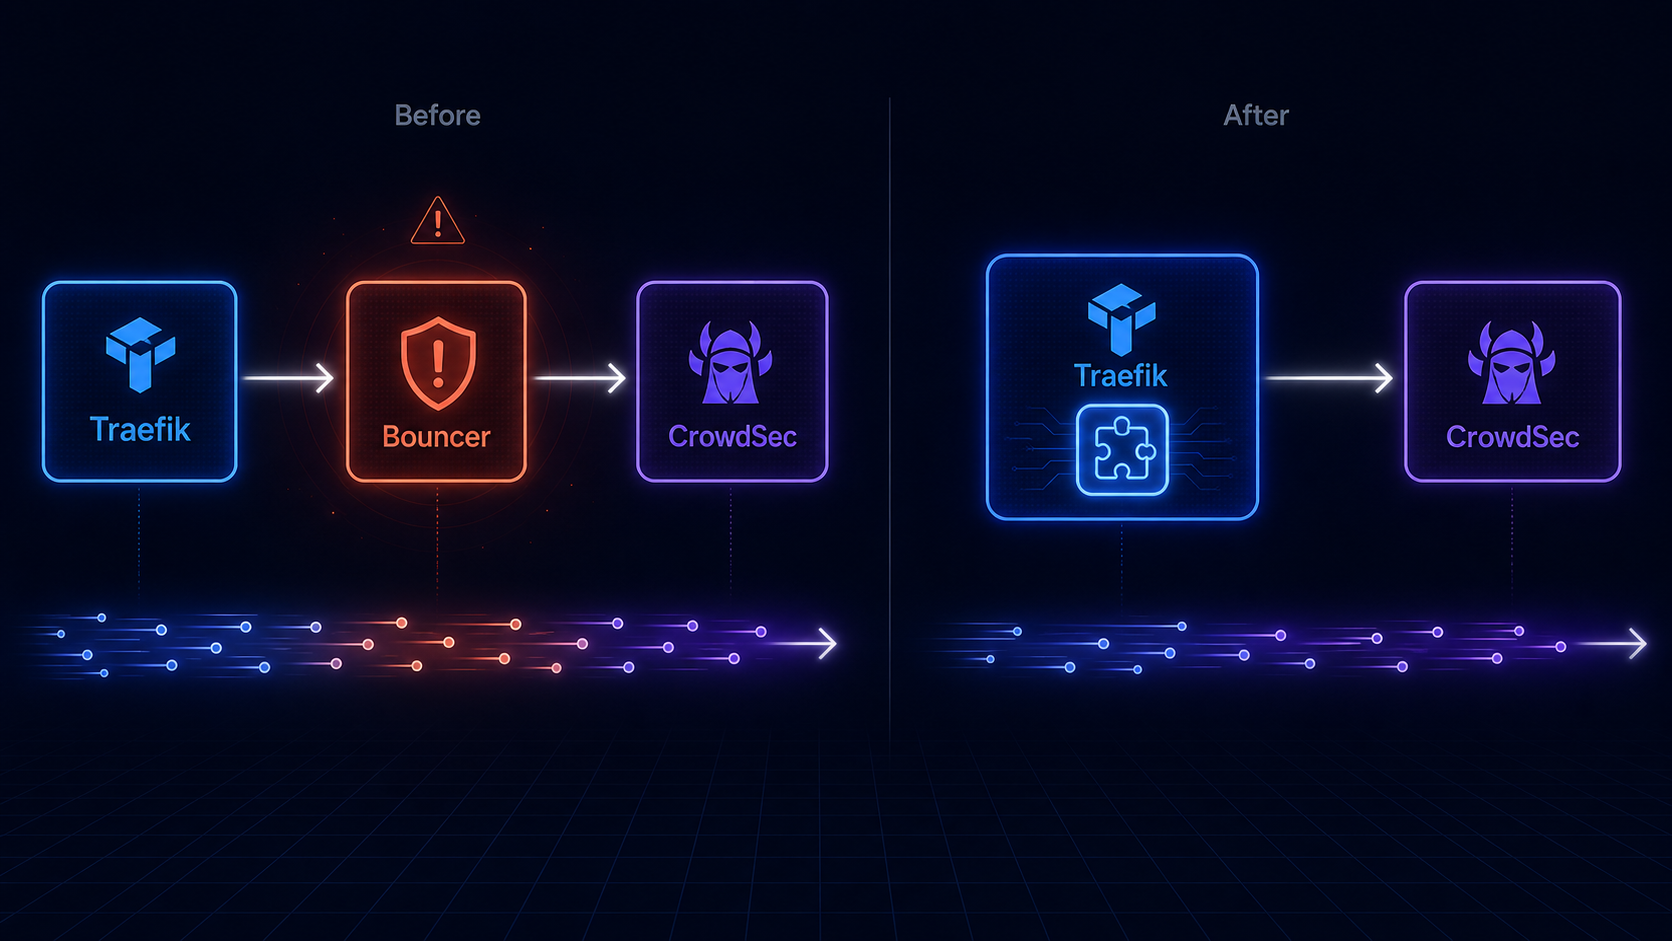
Replacing the CrowdSec Bouncer
This one deserves its own section because it’s a meaningful architectural change, not just a configuration tweak.
I was running fbonalair/traefik-crowdsec-bouncer:0.5.0 as a forwardAuth middleware. The bouncer container sits between Traefik and every service: every request gets forwarded to the bouncer, which checks the IP against CrowdSec’s decision list, and either allows or denies it.
The problem: the fbonalair image is built on Debian 11 with go1.17 from 2022. Grype flagged it with dozens of high and critical CVEs, including actively exploited ones. The image had clearly been abandoned.
The fix was to replace the entire architecture. CrowdSec provides an official Traefik plugin (maxlerebourg/crowdsec-bouncer-traefik-plugin) that runs natively inside the Traefik process instead of as a separate container. This is strictly better:
- No separate container to maintain or scan
- No extra network hop on every request
- Actively maintained as part of the Traefik plugin ecosystem
- Smaller attack surface overall
The migration has three parts.
1. Declare the plugin in Traefik’s static config (in the command: section of docker-compose.yml):
- --experimental.plugins.crowdsec-bouncer-traefik-plugin.moduleName=github.com/maxlerebourg/crowdsec-bouncer-traefik-plugin
- --experimental.plugins.crowdsec-bouncer-traefik-plugin.version=v1.5.1
(The experimental.plugins prefix is just Traefik’s namespace for all third-party plugins — it’s not a stability warning.)
2. Replace the forwardAuth middleware in dynamic.yml:
crowdsec-bouncer:
  plugin:
    crowdsec-bouncer-traefik-plugin:
      enabled: true
      crowdsecMode: stream
      crowdsecLapiHost: crowdsec:8080
      crowdsecLapiKeyFile: /run/secrets/crowdsec_bouncer_api_key
      crowdsecLapiScheme: http
Note crowdsecLapiKeyFile rather than crowdsecLapiKey. The plugin supports reading the API key from a file, so the actual secret never appears in your config. The file is mounted into Traefik as a read-only Docker secret.
3. Add CrowdSec to the traefik_proxy network, since the plugin now needs to reach CrowdSec directly from inside Traefik rather than via a bridge container.
One gotcha worth knowing: in stream mode, the plugin caches decisions locally and syncs with CrowdSec every 60 seconds. This means if you delete a ban from CrowdSec, the plugin may still enforce it for up to a minute while its cache refreshes. Not a problem in practice, just something to know when testing.
The crowdsec-bouncer@file middleware name stays the same across every service label in your stack. No other changes needed.
The Bigger Lesson
What this process taught me is that security isn’t a state you reach. It’s a practice. My homelab wasn’t insecure because I was careless. It had a well-designed perimeter with Cloudflare Tunnel, Authentik SSO, CrowdSec, and UFW rate limiting. But the interior had accumulated quiet technical debt: unmaintained images, default configurations that nobody had ever questioned, a permissions mistake on a few .env files.
The tooling I’ve now got in place gives me visibility I didn’t have before:
- Grype tells me every week which containers have CVEs worth worrying about, filtered by actual exploit probability
- Lynis tells me whether the host has drifted from baseline
- WUD tells me when my image versions are behind
- A weekly
apt upgradekeeps the host packages current automatically
None of these are complex to set up. The Lynis install is one apt command. Grype is a shell script. The n8n workflows that run them are maybe 30 minutes of work each. The return on that investment is a hardening score of 75/100, zero active warnings, and the kind of quiet confidence that means I’m not going to find out about a problem from someone else.
If you’re running a homelab with more than a handful of services, start with Lynis. Run it once, read the report, and fix the easy things. You’ll be surprised how much low-hanging fruit there is.